Bootstrapping a self-service AI platform with GitOps
Date: 2026-06-19
The source code for this article is available on: GitHub, GitCode.
Kubeflow transforms Kubernetes into a self-service platform for AI practitioners and data scientists alike. It incorporates both established and emerging cloud and AI-native projects such as Istio, Envoy and Knative to support the entire MLOps lifecycle: data cleaning and preprocessing, model training, validation and serving etc. Originally developed by Google to run TensorFlow on Kubernetes, it is now a CNCF Incubating project.
Kubeflow Community Distribution (KCD) is the official community version of Kubeflow designed to run on vanilla Kubernetes. It is available as a Kustomization which can be installed manually with kubectl or declaratively via GitOps with Argo CD or Flux.
Follow me through this article as we bootstrap Kubeflow on K3s with GPU support, leveraging the App of Apps pattern with Argo CD to deploy KCD 26.03.1 together with NVIDIA GPU Operator 26.3.2 and validating our installation with a GPU-enabled PyTorch notebook.
Prerequisites
Proficiency with Linux and Kubernetes is assumed. Familiarity with AI/ML-related concepts and tools such as Jupyter notebooks, Python programming and PyTorch is recommended but not required.
Lab environment
The instructions in this lab were validated on Huawei Cloud with a standalone pi2.2xlarge.4 Elastic Cloud Server (ECS) instance. The ECS instance had 8 vCPUs and 32G memory with a single 128G system disk and 1 NVIDIA Tesla T4 datacenter GPU.
The operating system image is based on Ubuntu 22.04 LTS (Jammy Jellyfish). All commands were executed directly as the root user.
Preparing our node for Kubeflow
The following steps were performed to ensure our ECS instance runs Kubeflow smoothly.
Increase the inotify resource limits
By default, the fs.inotify.max_user_instances sysctl is set to 128 which is quickly exhausted when multiple pods are deployed on the same node. We increase it to 8192 along with a related option fs.inotify.max_user_watches which is also increased from around 250k to 1Mi.
Add the following lines to /etc/sysctl.d/99-increase-inotify-limits.conf and reload them with sysctl --system.
fs.inotify.max_user_instances=8192
fs.inotify.max_user_watches=1048576
Install Go 1.26.4
Go is required to build and deploy the Argo CD Operator from source. Version 0.18.0 of the operator is the latest version at the time of writing which supports building with Go 1.26.
Follow the official instructions to download and install Go on Linux. Ensure /usr/local/go/bin is in your PATH.
pushd $(mktemp -d)
wget https://go.dev/dl/go1.26.4.linux-amd64.tar.gz
rm -rf /usr/local/go && tar -C /usr/local -xzf go1.26.4.linux-amd64.tar.gz
echo "export PATH=\$PATH:/usr/local/go/bin" | tee "$HOME/.profile"
source "$HOME/.profile"
popd
Update the NVIDIA drivers and load the UVM module
Modern versions of CUDA starting from 12.x require NVIDIA driver versions 5xx and above. Our ECS instance had the deprecated NVIDIA driver version 4xx installed which is not supported by CUDA 12.x / 13.x and causes the CUDA validation step in the NVIDIA GPU Operator deployment to fail.
Uninstall all outdated NVIDIA drivers with the command below.
apt purge -y '*nvidia*' && apt autoremove --purge -y
Now install the latest supported drivers with ubuntu-drivers autoinstall.
ubuntu-drivers autoinstall
For the NVIDIA GPU Operator to work properly, we also need to load the Unified Virtual Memory (UVM) module. Configure the module to load on system boot by creating a file /etc/modules-load.d/99-nvidia-uvm.conf with the following content.
nvidia-uvm
Reboot the system to take effect. Ensure the module is loaded by verifying that the below command returns at least 1 non-empty line of output.
lsmod | grep nvidia_uvm
Installing K3s and increasing the pod limit
K3s is a lightweight Kubernetes distribution optimized for edge environments. We’ll use K3s for our lab since it’s dead simple to install and get running on a single server.
Install version v1.35.5+k3s1 of K3s with the official installer. We’ll also increase the per-node pod limit from 110 to 250 since a fresh Kubeflow installation alone consists of approximately 70 pods.
curl -sfL https://get.k3s.io | \
    INSTALL_K3S_VERSION="v1.35.5+k3s1" sh -s - server \
    --kubelet-arg="max-pods=250"
Now wait for our node to become ready.
kubectl wait \
    --for=condition=Ready \
    node \
    --all \
    --timeout=300s
Deploying the Argo CD Operator and cluster-wide Argo CD instance
The Argo CD Operator enables us to define Argo CD instances declaratively as Kubernetes custom resources. We’ll deploy v0.18.0 of the operator directly from the GitHub repository: argoproj-labs/argocd-operator
Clone version v0.18.0 of the operator and deploy it with make deploy.
git clone -b v0.18.0 https://github.com/argoproj-labs/argocd-operator.git
pushd argocd-operator/
make deploy
By default, each Argo CD instance is scoped to its own namespace. Since we’re installing both the NVIDIA GPU Operator and Kubeflow as platform components, let’s set the ARGOCD_CLUSTER_CONFIG_NAMESPACES=argocd environment variable on our operator workload. The variable instructs the Argo CD Operator to treat the Argo CD instance in the argocd namespace as a cluster-wide instance, allowing it to manage cluster-scoped resources such as ClusterRoles and ClusterRoleBindings. We’ll deploy our cluster-wide Argo CD instance in a later step.
kubectl -n argocd-operator-system set env \
    deploy/argocd-operator-controller-manager \
    ARGOCD_CLUSTER_CONFIG_NAMESPACES=argocd \
    -c manager
Wait for our operator deployment to become ready.
kubectl -n argocd-operator-system wait \
    --for=condition=Available \
    deploy/argocd-operator-controller-manager \
    --timeout=300s
Create our argocd namespace and declare our cluster-wide Argo CD instance. The default configuration should suffice so we leave the spec empty.
kubectl create ns argocd
kubectl -n argocd create -f - << EOF
---
apiVersion: argoproj.io/v1beta1
kind: ArgoCD
metadata:
  name: argocd
spec: {}
EOF
Wait for the cluster Argo CD instance to be reconciled and its workloads to be available.
kubectl -n argocd wait \
    --for=condition=Reconciled \
    argocd.argoproj.io/argocd \
    --timeout=300s
kubectl -n argocd wait \
    --for=condition=Available \
    deploy \
    --all \
    --timeout=300s
Leave the project directory.
popd
Bootstrapping Kubeflow with GPU support using the App of Apps pattern
The App of Apps pattern is the practice of defining a parent Argo CD application which manages 0 or more child Argo CD applications. The parent application is managed by the platform team which oversees the entire Kubernetes environment. Each child application represents a deliverable unit or workload. It represents either an individual platform component owned by the respective infrastructure team or a self-contained application comprised of a collection of microservices owned by the respective application team.
For example:
- The parent application
argocd-appsis managed by the platform engineering team which oversees the entire Kubernetes infrastructure - A child application
ciliummanages the Cilium CNI critical to cluster operations. It is managed by the network team - Another child application
tektonmanages Tekton which powers the developers’ CI/CD pipelines. It is managed by the DevOps team - 2 child applications,
bookinfoandstar-wars, manage the Bookinfo and Star Wars applications respectively, each in their own dedicated namespace. They are managed by 2 separate application teams with each team responsible for their own app
Here, we employ the App of Apps pattern to bootstrap 2 platform components for our quick demo.
- NVIDIA GPU Operator: enables Kubernetes workloads to request GPUs for model training and inference
- Kubeflow: an open source platform enabling self-service for AI/ML practitioners and data scientists alike
Clone the GitHub repository and make it our working directory: DonaldKellett/kubeflow-gitops-demo
git clone https://github.com/DonaldKellett/kubeflow-gitops-demo.git
pushd kubeflow-gitops-demo/
Build the Kustomization under bootstrap/overlays/v1/ and deploy the generated manifests to the argocd namespace using server-side apply.
kubectl kustomize bootstrap/overlays/v1/ | \
    kubectl -n argocd apply -f - --server-side
Wait at most 30 minutes for both components to report as Healthy. Due to a known issue kubeflow/community-distribution#3205, the metadata-grpc-deployment workload in the kubeflow namespace may be stuck in a CrashLoopBackOff state, causing our kubeflow application to remain stuck in the Degraded state indefinitely.
As long as the metadata-grpc-deployment is the only workload with this issue, it should not affect our quick demo with a GPU-enabled PyTorch notebook as our final validation step. Nevertheless, if it bothers you, consider fixing it manually or simply tearing down and re-creating the lab environment from scratch.
kubectl -n argocd wait \
    --for=jsonpath='{.status.health.status}'=Healthy \
    applications.argoproj.io \
    --all \
    --timeout=1800s
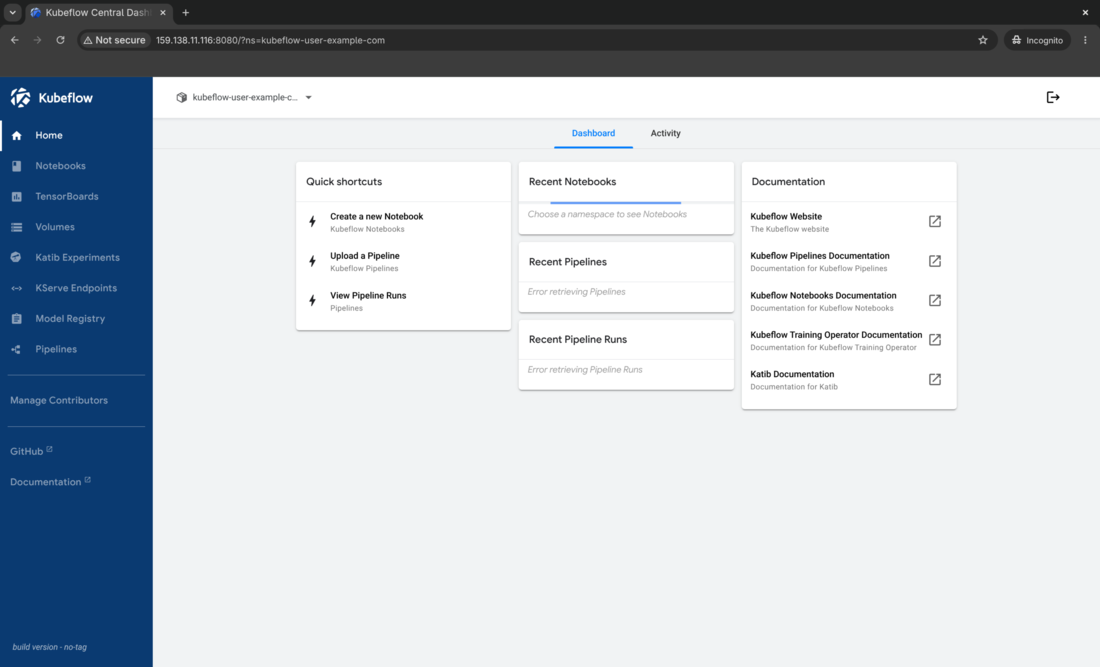
Logging in to the Kubeflow dashboard
With our Kubeflow platform ready, follow the official instructions in kubeflow/community-distribution. Use kubectl port-forward to expose the Kubeflow dashboard at port 8080/tcp.
kubectl port-forward svc/istio-ingressgateway -n istio-system 8080:80
Visit http://localhost:8080/ which displays the Kubeflow landing page.

Click the “Sign in with Dex” button and fill in the default login credentials below.
- Username:
user@example.com - Password:
12341234

You are redirected to the Kubeflow dashboard. Congratulations on getting Kubeflow up and running!
Validating our installation with a GPU-enabled PyTorch notebook
Let’s create a Kubeflow notebook with PyTorch and CUDA installed. CUDA enables us to leverage NVIDIA GPUs in our PyTorch deep learning experiments to speed up model training and inference.
Inspect the sample Notebook custom resource and the corresponding workspace PVC under samples/pytorch-gpu-example.yaml. It creates the Notebook resource and PVC under the kubeflow-user-example-com data science project (namespace) owned by the user@example.com user.
Notice the nvidia.com/gpu=1 field under .spec.template.spec.containers[].resources.{requests,limits} which requests 1 NVIDIA GPU from our Kubernetes cluster. This enables our PyTorch notebook with CUDA installed to access the underlying GPU hardware resource.
---
apiVersion: kubeflow.org/v1
kind: Notebook
metadata:
  name: pytorch-gpu-example
  namespace: kubeflow-user-example-com
spec:
  template:
    spec:
      containers:
        - name: pytorch-gpu-example
          image: ghcr.io/kubeflow/kubeflow/notebook-servers/jupyter-pytorch-cuda:v1.11.0
          resources:
            requests:
              cpu: "2"
              memory: 8Gi
              nvidia.com/gpu: "1"
            limits:
              cpu: "2"
              memory: 8Gi
              nvidia.com/gpu: "1"
          env:
            - name: NOTEBOOK_ARGS
              value: |-
                --ServerApp.port=8888
                --ServerApp.token=''
                --ServerApp.password=''
                --ServerApp.base_url=/notebook/kubeflow-user-example-com/pytorch-gpu-example
                --ServerApp.quit_button=False
          volumeMounts:
            - name: pytorch-gpu-example-volume
              mountPath: /home/jovyan
          readinessProbe:
            httpGet:
              path: /notebook/kubeflow-user-example-com/pytorch-gpu-example/api
              port: notebook-port
          livenessProbe:
            httpGet:
              path: /notebook/kubeflow-user-example-com/pytorch-gpu-example/api
              port: notebook-port
          ports:
            - containerPort: 8888
              name: notebook-port
      volumes:
        - name: pytorch-gpu-example-volume
          persistentVolumeClaim:
            claimName: pytorch-gpu-example-pvc
---
apiVersion: v1
kind: PersistentVolumeClaim
metadata:
  name: pytorch-gpu-example-pvc
  namespace: kubeflow-user-example-com
spec:
  accessModes:
    - ReadWriteOnce
  resources:
    requests:
      storage: 10Gi
Deploy it to our cluster.
kubectl create -f samples/pytorch-gpu-example.yaml
Now wait at most 15 minutes for our notebook to be ready. The notebook image is a few GiB in size so the initial pull may take around 5 minutes to complete depending on your network bandwidth and Docker Hub rate limits.
kubectl -n kubeflow-user-example-com wait \
    --for=condition=Ready \
    pod/pytorch-gpu-example-0 \
    --timeout=900s
Visit http://localhost:8080/notebook/kubeflow-user-example-com/pytorch-gpu-example/ in your browser, then upload the sample notebook samples/00-pytorch-gpu-example.ipynb to the JupyterLab UI which contains the following Python code written with PyTorch.
import torch

has_gpu = torch.cuda.is_available()
print(f'GPU acceleration is{'' if has_gpu else ' NOT'} available in this notebook!')
device = torch.device('cuda') if has_gpu else torch.device('cpu')
A = torch.randn(2, 2, device=device)
B = torch.randn(2, 2, device=device)
C = A @ B
C, C.device
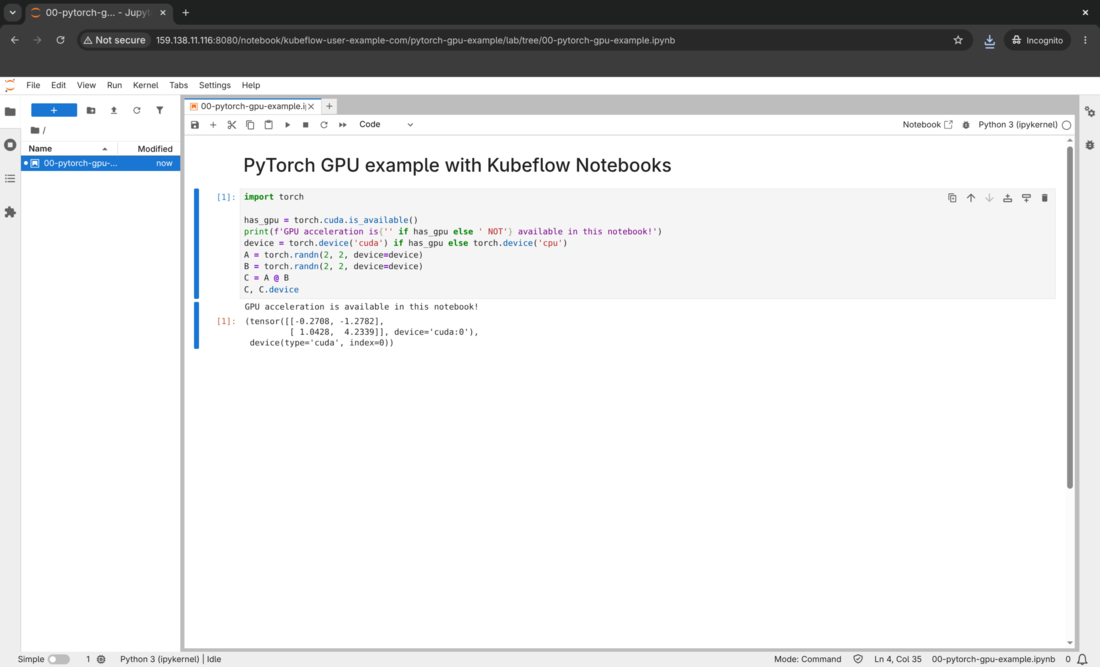
Click the Run button to the top left of the window and you should get the following output. The exact numbers may vary between consecutive runs.
GPU acceleration is available in this notebook!
(tensor([[-0.2708, -1.2782],
         [ 1.0428,  4.2339]], device='cuda:0'),
 device(type='cuda', index=0))
Congratulations, you created your first PyTorch deep learning experiment with GPU acceleration enabled!
Exit the project directory.
popd
Demo
View the demo on Asciinema.
A command-line walkthrough of this lab is included below.
Concluding remarks and going further
Kubeflow is the de-facto standard for managing the entire MLOps lifecycle on Kubernetes. Nevertheless, given the weight and complexity of Kubeflow, it may not be wise to deploy and manage upstream Kubeflow directly for production teams and workloads.
To convert this quick demo into a production-ready Kubeflow deployment, consider:
- Securing the Kubeflow dashboard with TLS
- Configuring enterprise authentication and RBAC for proper multi-tenancy
- Upgrade to a vendor-backed distribution of Kubeflow such as Charmed Kubeflow or Red Hat OpenShift AI (RHOAI). Their enterprise support options free your MLOps and data science teams from the undifferentiated heavy lifting of managing Kubeflow itself, enabling them to focus on the actual AI/ML workloads which deliver actual business value
I hope you enjoyed following through this article as much as I did authoring it and stay tuned for updates ;-)
Subscribe:
![]()
![]()
![[Valid RSS]](/assets/images/valid-rss-rogers.png)
![[Valid Atom 1.0]](/assets/images/valid-atom.png)