The source code for this lab exercise is available on GitHub.
Edge computing is an extension of cloud computing and broadly refers to the paradigm where certain computational and data processing tasks are delegated from the cloud to devices residing at the network edge, close to the source of data being collected. This obviates the need for such edge nodes to forward the collected data to the cloud for central processing and decision making, greatly reducing the network traffic between cloud and edge and enabling edge nodes to make decisions autonomously in near-real time based on the collected data, which may be desirable or even required for certain industrial use cases.
Edge nodes usually possess one or more of the following characteristics:
- Resides at the network edge as opposed to within a cloud datacenter
- Resides close to one or more sources of data being collected, e.g. via sensors
- Is resource constrained compared to enterprise server hardware
- May suffer from an unstable, intermittent or nonexistent Internet connection
- Are able or expected to process and respond to locally collected data in an autonomous fashion
MicroK8s is a lightweight, batteries included Kubernetes distribution by Canonical designed for running edge workloads which also happens to be developer-friendly and a great choice for building your own homelab. The following lab covers how to install and run MicroK8s on your own edge node running Ubuntu 22.04 LTS, deploy the NGINX web service and exposing your NGINX website to the Internet with SSL/TLS enabled using AWS resources included within the Free Tier.
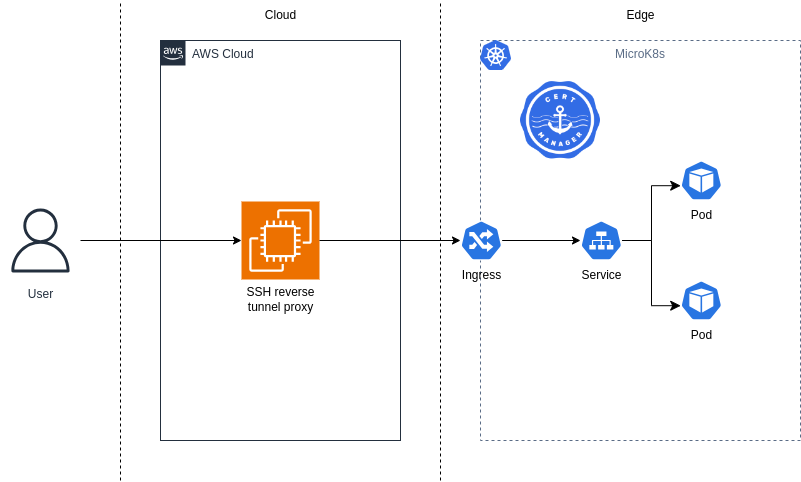
Lab: Exposing your MicroK8s homelab to the Internet
Prerequisites
A basic understanding of Linux and Kubernetes is assumed. If not, consider enrolling in the following online, self-paced courses on edX offered by the Linux Foundation at no cost:
Setting up your environment
Apart from your laptop, desktop or workstation (any laptop will do), you’ll need:
- An AWS account
- An edge node running Ubuntu 22.04 LTS with at least 2 vCPUs, 4G memory and 20G storage
Some considerations:
- Windows users may wish to complete the lab in a Unix/Linux environment within WSL2
- The lab should work on other clouds such as Azure or Alibaba Cloud as well, but will require manual provisioning and configuration of cloud resources since as VM instances and security groups
- The edge node running Ubuntu 22.04 LTS could be a spare laptop or Raspberry Pi (most exciting), a VM running on your own laptop with VirtualBox, VMware etc. (meh) or a cloud instance in a private subnet with outbound Internet connectivity (kind of defeats the purpose of this lab)
Generating an SSH key pair for our EC2 instance
Generate a dedicated SSH key pair for our Amazon EC2 instance which will be used both for connecting to our instance and creating an SSH reverse tunnel for forwarding HTTP(s) traffic to our MicroK8s edge node in a later step.
N.B. You are strongly advised to generate a dedicated SSH key pair for this lab even if you already have a default SSH key pair for security reasons.
ssh-keygen
Save the private key as $HOME/.ssh/microk8s-homelab.pem and the public key as $HOME/.ssh/microk8s-homelab.pub.
Setting up your AWS account
You’ll need to set up your AWS account and create an IAM administrator, then generate an access key and secret key for your IAM administrator for setting up AWS CLI v2 in our next step. Consult the official AWS documentation if in doubt.
Setting up AWS CLI v2
First make sure $HOME/.local/bin/ exists and is in your PATH so sudo is not required for installing the various command-line tools in this lab on your local laptop / desktop / workstation.
mkdir -p "$HOME/.local/bin/"echo "export PATH=\"\$HOME/.local/bin:\$PATH\"" >> "$HOME/.bashrc"source "$HOME/.bashrc"
Now download AWS CLI v2 from the official website and install it using the provided script:
curl "https://awscli.amazonaws.com/awscli-exe-linux-x86_64.zip" -o "awscliv2.zip"unzip -n awscliv2.zip./aws/install --bin-dir "$HOME/.local/bin/" --install-dir "$HOME/.local/aws-cli/"
You’ll also need to configure AWS CLI v2 with your access and secret keys when prompted:
aws configure
Confirm that the setup is functional:
aws ec2 describe-instances
Sample output:
{ "Reservations": []}
Installing OpenTofu
OpenTofu is an open source infrastructure-as-code (IaC) tool that enables us to provision and manage AWS cloud resources in a completely automated manner, sparing us the effort of clicking through the AWS web console.
Install OpenTofu from the official release binaries. The latest version is 1.6.1 at the time of writing.
wget https://github.com/opentofu/opentofu/releases/download/v1.6.1/tofu_1.6.1_linux_amd64.zipunzip -n tofu_1.6.1_linux_amd64.zipmv tofu "$HOME/.local/bin/"
Confirm that OpenTofu is correctly installed.
tofu -version
Sample output:
OpenTofu v1.6.1on linux_amd64
Deploying the automation stack
Clone the project repository and make it your working directory:
git clone https://github.com/DonaldKellett/microk8s-homelab.gitcd microk8s-homelab/
Set our cloud provider to AWS and fill in a valid, working email address for receiving Let’s Encrypt notifications in a later step; otherwise Let’s Encrypt will refuse to issue the required SSL/TLS certificates for securing our website.
export CLOUD_PROVIDER="aws"export TF_VAR_email="webmaster@example.com" # replace me!
Now apply our OpenTofu configuration which creates the AWS cloud resources on our behalf.
tofu -chdir="opentofu/${CLOUD_PROVIDER}/" inittofu -chdir="opentofu/${CLOUD_PROVIDER}/" apply
Answer yes when prompted and make note of the IP address printed to the console – this is the public IP address of our EC2 instance.
Preparing our EC2 instance for reverse tunneling
Now log into our EC2 instance. Remember to use the dedicated SSH key pair we generated earlier. Here’s what your SSH command should look like – replace x.x.x.x with the public IP address we noted earlier:
export MICROK8S_SSH_PRIVKEY="$HOME/.ssh/microk8s-homelab.pem" # replace me!export MICROK8S_PROXY_IP="x.x.x.x" # replace me!ssh -i "${MICROK8S_SSH_PRIVKEY}" ubuntu@"${MICROK8S_PROXY_IP}"
Run the remaining commands in this section on our EC2 instance.
Copy the SSH authorized keys to the root user. This is required for proxying the standard HTTP(s) ports (80/tcp and 443/tcp respectively) to our MicroK8s edge node via SSH reverse tunneling as non-root users cannot bind to privileged ports by default.
sudo mkdir -p /root/.ssh/sudo cp "$HOME/.ssh/authorized_keys" /root/.ssh/authorized_keyssudo chmod 700 /root/.ssh/sudo chmod 600 /root/.ssh/authorized_keys
Now set the appropriate sshd configuration in /etc/ssh/sshd_config and restart the sshd service:
cat << EOF | sudo tee -a /etc/ssh/sshd_configGatewayPorts yesPermitRootLogin prohibit-passwordEOFsudo systemctl restart sshd.service
Ensure that the sshd service is active and running:
systemctl status sshd.service --full --no-pager
Sample output:
● ssh.service - OpenBSD Secure Shell server Loaded: loaded (/lib/systemd/system/ssh.service; enabled; vendor preset: enabled) Drop-In: /usr/lib/systemd/system/ssh.service.d └─ec2-instance-connect.conf Active: active (running) since Tue 2024-02-13 05:36:01 UTC; 1min 1s ago Docs: man:sshd(8) man:sshd_config(5) Process: 1370 ExecStartPre=/usr/sbin/sshd -t (code=exited, status=0/SUCCESS) Main PID: 1371 (sshd) Tasks: 1 (limit: 1091) Memory: 1.7M CPU: 24ms CGroup: /system.slice/ssh.service └─1371 "sshd: /usr/sbin/sshd -D -o AuthorizedKeysCommand /usr/share/ec2-instance-connect/eic_run_authorized_keys %u %f -o AuthorizedKeysCommandUser ec2-instance-connect [listener] 0 of 10-100 startups"Feb 13 05:36:01 ip-10-0-1-12 systemd[1]: Starting OpenBSD Secure Shell server...Feb 13 05:36:01 ip-10-0-1-12 sshd[1371]: Server listening on 0.0.0.0 port 22.Feb 13 05:36:01 ip-10-0-1-12 sshd[1371]: Server listening on :: port 22.Feb 13 05:36:01 ip-10-0-1-12 systemd[1]: Started OpenBSD Secure Shell server.
Our EC2 instance is now set up – log out of the EC2 instance and return to our laptop session.
Copying artifacts to our MicroK8s edge node
The SSH private key for connecting to our EC2 instance must be copied to our edge node for establishing the SSH reverse tunnel. The commands below assume you have SSH access to your edge node from your laptop – remember to replace the login username MICROK8S_USER and edge node IP MICROK8S_IP accordingly.
export MICROK8S_USER="ubuntu" # replace me!export MICROK8S_IP="x.x.x.x" # replace me!export MICROK8S_SSH_PRIVKEY="$HOME/.ssh/microk8s-homelab.pem" # replace me!scp "${MICROK8S_SSH_PRIVKEY}" "${MICROK8S_USER}@${MICROK8S_IP}:~/microk8s-homelab.pem"
Additionally, when we created the AWS resources with OpenTofu, two Kubernetes manifests were also auto-generated under the manifests/ directory:
letsencrypt-clusterissuer.yaml: Let’s EncryptClusterIssuerfor cert-manager which automates the process of obtaining an SSL/TLS certificate from Let’s Encryptnginx-ingress.yaml: Kubernetes Ingress for our NGINX web service. This enables us to visit our website via a domain name instead of entering the IP address directly
Here’s what the manifests look like – yours will be slightly different since the EC2 public IP addresses are different:
apiVersion: cert-manager.io/v1kind: ClusterIssuermetadata: name: letsencryptspec: acme: email: donaldsebleung@gmail.com server: https://acme-v02.api.letsencrypt.org/directory privateKeySecretRef: name: letsencrypt solvers: - http01: ingress: class: publicapiVersion: networking.k8s.io/v1kind: Ingressmetadata: creationTimestamp: null name: nginx annotations: cert-manager.io/cluster-issuer: letsencryptspec: rules: - host: nginx.16.163.22.52.sslip.io http: paths: - backend: service: name: nginx port: number: 80 path: / pathType: Prefix tls: - hosts: - nginx.16.163.22.52.sslip.io secretName: nginx-certstatus: loadBalancer: {}
Notice the domain name nginx.16.163.22.52.sslip.io (this depends on the IP address). This is a subdomain under sslip.io, a public DNS service that returns the same IP address given a domain name with an embedded IP address. Using this DNS service enables us to request Let’s Encrypt certificates without purchasing our own domain name.
Copy these manifests to our edge node:
scp manifests/nginx-ingress.yaml "${MICROK8S_USER}@${MICROK8S_IP}:~/nginx-ingress.yaml"scp manifests/letsencrypt-clusterissuer.yaml "${MICROK8S_USER}@${MICROK8S_IP}:~/letsencrypt-clusterissuer.yaml"
Now SSH into our edge node and run the remaining commands on our edge node unless otherwise instructed.
Installing MicroK8s on our edge node
MicroK8s can be installed as a Snap on Ubuntu with a single command (this may take a while depending on network bandwidth):
sudo snap install microk8s --classic
Now add the current user to the microk8s group:
sudo usermod -aG microk8s "${USER}"
Log out and in again for group membership to take effect.
Wait for MicroK8s to become ready – again, this may take a few minutes:
microk8s status --wait-ready
Sample output:
microk8s is runninghigh-availability: no datastore master nodes: 127.0.0.1:19001 datastore standby nodes: noneaddons: enabled: dns # (core) CoreDNS ha-cluster # (core) Configure high availability on the current node helm # (core) Helm - the package manager for Kubernetes helm3 # (core) Helm 3 - the package manager for Kubernetes disabled: cert-manager # (core) Cloud native certificate management cis-hardening # (core) Apply CIS K8s hardening community # (core) The community addons repository dashboard # (core) The Kubernetes dashboard gpu # (core) Automatic enablement of Nvidia CUDA host-access # (core) Allow Pods connecting to Host services smoothly hostpath-storage # (core) Storage class; allocates storage from host directory ingress # (core) Ingress controller for external access kube-ovn # (core) An advanced network fabric for Kubernetes mayastor # (core) OpenEBS MayaStor metallb # (core) Loadbalancer for your Kubernetes cluster metrics-server # (core) K8s Metrics Server for API access to service metrics minio # (core) MinIO object storage observability # (core) A lightweight observability stack for logs, traces and metrics prometheus # (core) Prometheus operator for monitoring and logging rbac # (core) Role-Based Access Control for authorisation registry # (core) Private image registry exposed on localhost:32000 rook-ceph # (core) Distributed Ceph storage using Rook storage # (core) Alias to hostpath-storage add-on, deprecated
Creating our SSH reverse tunnel with AutoSSH
Before creating our SSH reverse tunnel, enable the ingress addon which allows external users to access services running on our MicroK8s cluster. Addons are a unique feature of MicroK8s which enable us to start using common Kubernetes extensions and middleware with a single command.
microk8s enable ingress
Sample output:
Infer repository core for addon ingressEnabling Ingressingressclass.networking.k8s.io/public createdingressclass.networking.k8s.io/nginx creatednamespace/ingress createdserviceaccount/nginx-ingress-microk8s-serviceaccount createdclusterrole.rbac.authorization.k8s.io/nginx-ingress-microk8s-clusterrole createdrole.rbac.authorization.k8s.io/nginx-ingress-microk8s-role createdclusterrolebinding.rbac.authorization.k8s.io/nginx-ingress-microk8s createdrolebinding.rbac.authorization.k8s.io/nginx-ingress-microk8s createdconfigmap/nginx-load-balancer-microk8s-conf createdconfigmap/nginx-ingress-tcp-microk8s-conf createdconfigmap/nginx-ingress-udp-microk8s-conf createddaemonset.apps/nginx-ingress-microk8s-controller createdIngress is enabled
Install AutoSSH for creating SSH connections that persist across reboots, a requirement for our SSH reverse tunnel:
sudo apt update && sudo apt install -y autossh
Now create the corresponding AutoSSH systemd service – replace x.x.x.x with the EC2 public IP address we noted earlier:
export MICROK8S_PROXY_IP="x.x.x.x" # replace me!cat << EOF | sudo tee /etc/systemd/system/autossh.service[Unit]Description=SSH reverse tunnel for ingressAfter=network.target[Service]User=${USER}ExecStart=/usr/bin/autossh \ -i "$HOME/microk8s-homelab.pem" \ -o "ServerAliveInterval 60" \ -o "ServerAliveCountMax 5" \ -o "StrictHostKeyChecking no" \ -o "UserKnownHostsFile /dev/null" \ -nNT \ -R 0.0.0.0:80:localhost:80 \ -R 0.0.0.0:443:localhost:443 \ root@"${MICROK8S_PROXY_IP}"[Install]WantedBy=multi-user.targetEOF
Start and enable the AutoSSH service:
sudo systemctl daemon-reloadsudo systemctl enable --now autossh.service
Ensure the AutoSSH service is active and running:
systemctl status autossh.service --full --no-pager
Sample output:
● autossh.service - SSH reverse tunnel for ingress Loaded: loaded (/etc/systemd/system/autossh.service; enabled; vendor preset: enabled) Active: active (running) since Tue 2024-02-13 06:27:25 UTC; 4s ago Main PID: 24270 (autossh) Tasks: 2 (limit: 4558) Memory: 3.1M CPU: 30ms CGroup: /system.slice/autossh.service ├─24270 /usr/lib/autossh/autossh -i /home/dsleung/microk8s-homelab.pem -o "ServerAliveInterval 60" -o "ServerAliveCountMax 5" -o "StrictHostKeyChecking no" -o "UserKnownHostsFile /dev/null" -nNT -R 0.0.0.0:80:localhost:80 -R 0.0.0.0:443:localhost:443 root@16.163.22.52 └─24281 /usr/bin/ssh -L 62034:127.0.0.1:62034 -R 62034:127.0.0.1:62035 -i /home/dsleung/microk8s-homelab.pem -o "ServerAliveInterval 60" -o "ServerAliveCountMax 5" -o "StrictHostKeyChecking no" -o "UserKnownHostsFile /dev/null" -nNT -R 0.0.0.0:80:localhost:80 -R 0.0.0.0:443:localhost:443 root@16.163.22.52Feb 13 06:27:25 microk8s systemd[1]: Started SSH reverse tunnel for ingress.Feb 13 06:27:25 microk8s autossh[24270]: starting ssh (count 1)Feb 13 06:27:25 microk8s autossh[24270]: ssh child pid is 24281Feb 13 06:27:25 microk8s autossh[24281]: Warning: Permanently added '16.163.22.52' (ED25519) to the list of known hosts.
Now visit https://nginx.16.163.22.52.sslip.io/ in a web browser. Remember to replace 16.163.22.52 with your EC2 public IP address. You will receive a certificate warning from your browser which you should ignore and proceed with visiting the website, for which you should be greeted with a 404 page.
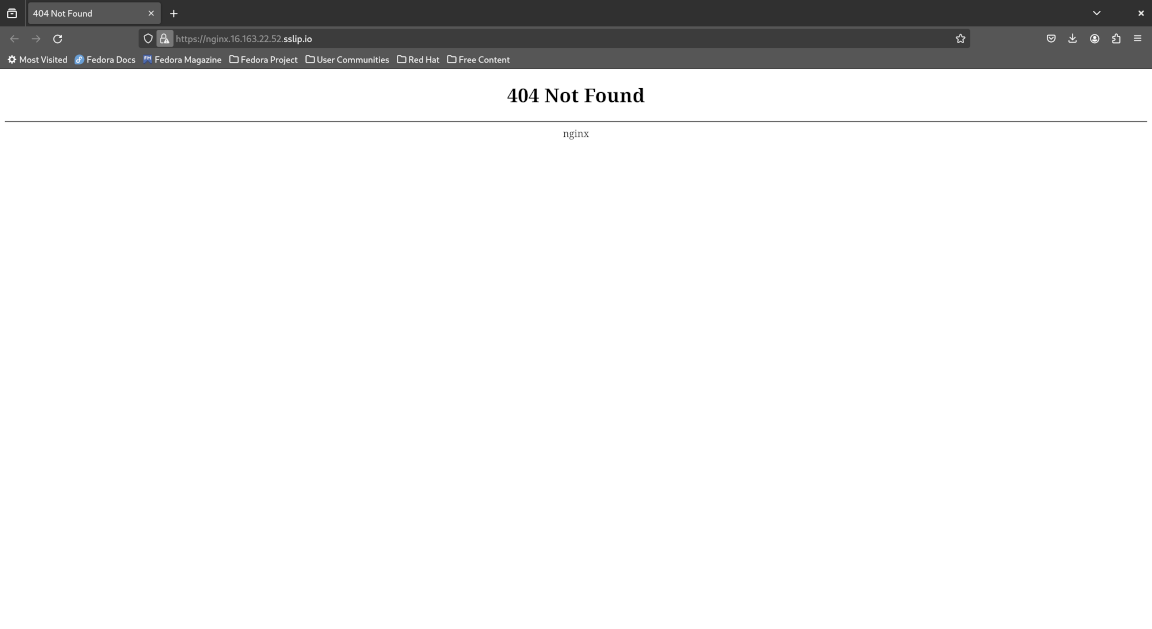
This is expected since we have not set up our website yet, but it tells us that our Kubernetes ingress running on our edge node is reachable from the public Internet via our EC2 cloud instance thanks to the SSH reverse tunnel – how cool is that? 😀
Setting up our website with SSL/TLS using cert-manager and Let’s Encrypt
cert-manager provides fully automated X.509 certificate management for Kubernetes and OpenShift via custom resource definitions (CRDs), obviating the need for manually running arcane openssl commands. It is available as a MicroK8s addon so can be enabled with a single command:
microk8s enable cert-manager
Sample output:
Infer repository core for addon cert-managerEnable DNS addonInfer repository core for addon dnsAddon core/dns is already enabledEnabling cert-managernamespace/cert-manager createdcustomresourcedefinition.apiextensions.k8s.io/certificaterequests.cert-manager.io createdcustomresourcedefinition.apiextensions.k8s.io/certificates.cert-manager.io createdcustomresourcedefinition.apiextensions.k8s.io/challenges.acme.cert-manager.io createdcustomresourcedefinition.apiextensions.k8s.io/clusterissuers.cert-manager.io createdcustomresourcedefinition.apiextensions.k8s.io/issuers.cert-manager.io createdcustomresourcedefinition.apiextensions.k8s.io/orders.acme.cert-manager.io createdserviceaccount/cert-manager-cainjector createdserviceaccount/cert-manager createdserviceaccount/cert-manager-webhook createdconfigmap/cert-manager-webhook createdclusterrole.rbac.authorization.k8s.io/cert-manager-cainjector createdclusterrole.rbac.authorization.k8s.io/cert-manager-controller-issuers createdclusterrole.rbac.authorization.k8s.io/cert-manager-controller-clusterissuers createdclusterrole.rbac.authorization.k8s.io/cert-manager-controller-certificates createdclusterrole.rbac.authorization.k8s.io/cert-manager-controller-orders createdclusterrole.rbac.authorization.k8s.io/cert-manager-controller-challenges createdclusterrole.rbac.authorization.k8s.io/cert-manager-controller-ingress-shim createdclusterrole.rbac.authorization.k8s.io/cert-manager-view createdclusterrole.rbac.authorization.k8s.io/cert-manager-edit createdclusterrole.rbac.authorization.k8s.io/cert-manager-controller-approve:cert-manager-io createdclusterrole.rbac.authorization.k8s.io/cert-manager-controller-certificatesigningrequests createdclusterrole.rbac.authorization.k8s.io/cert-manager-webhook:subjectaccessreviews createdclusterrolebinding.rbac.authorization.k8s.io/cert-manager-cainjector createdclusterrolebinding.rbac.authorization.k8s.io/cert-manager-controller-issuers createdclusterrolebinding.rbac.authorization.k8s.io/cert-manager-controller-clusterissuers createdclusterrolebinding.rbac.authorization.k8s.io/cert-manager-controller-certificates createdclusterrolebinding.rbac.authorization.k8s.io/cert-manager-controller-orders createdclusterrolebinding.rbac.authorization.k8s.io/cert-manager-controller-challenges createdclusterrolebinding.rbac.authorization.k8s.io/cert-manager-controller-ingress-shim createdclusterrolebinding.rbac.authorization.k8s.io/cert-manager-controller-approve:cert-manager-io createdclusterrolebinding.rbac.authorization.k8s.io/cert-manager-controller-certificatesigningrequests createdclusterrolebinding.rbac.authorization.k8s.io/cert-manager-webhook:subjectaccessreviews createdrole.rbac.authorization.k8s.io/cert-manager-cainjector:leaderelection createdrole.rbac.authorization.k8s.io/cert-manager:leaderelection createdrole.rbac.authorization.k8s.io/cert-manager-webhook:dynamic-serving createdrolebinding.rbac.authorization.k8s.io/cert-manager-cainjector:leaderelection createdrolebinding.rbac.authorization.k8s.io/cert-manager:leaderelection createdrolebinding.rbac.authorization.k8s.io/cert-manager-webhook:dynamic-serving createdservice/cert-manager createdservice/cert-manager-webhook createddeployment.apps/cert-manager-cainjector createddeployment.apps/cert-manager createddeployment.apps/cert-manager-webhook createdmutatingwebhookconfiguration.admissionregistration.k8s.io/cert-manager-webhook createdvalidatingwebhookconfiguration.admissionregistration.k8s.io/cert-manager-webhook createdWaiting for cert-manager to be ready....readyEnabled cert-manager===========================Cert-manager is installed. As a next step, try creating a ClusterIssuerfor Let's Encrypt by creating the following resource:$ microk8s kubectl apply -f - <<EOF---apiVersion: cert-manager.io/v1kind: ClusterIssuermetadata: name: letsencryptspec: acme: # You must replace this email address with your own. # Let's Encrypt will use this to contact you about expiring # certificates, and issues related to your account. email: me@example.com server: https://acme-v02.api.letsencrypt.org/directory privateKeySecretRef: # Secret resource that will be used to store the account's private key. name: letsencrypt-account-key # Add a single challenge solver, HTTP01 using nginx solvers: - http01: ingress: class: publicEOFThen, you can create an ingress to expose 'my-service:80' on 'https://my-service.example.com' with:$ microk8s enable ingress$ microk8s kubectl create ingress my-ingress \ --annotation cert-manager.io/cluster-issuer=letsencrypt \ --rule 'my-service.example.com/*=my-service:80,tls=my-service-tls'
Before we proceed, here’s a useful tip for the microk8s kubectl commands to follow. Make liberal use of tab auto-completion – for example, if you type:
microk8s kubectl cr<TAB>
Where <TAB> represents a literal Tab keypress, you should get:
microk8s kubectl create
This is especially useful for kubectl commands which are often lengthy and verbose by saving you some precious typing time.
Let’s Encrypt is a certificate authority (CA) which issues SSL/TLS certificates at no cost, making it an attractive option for securing websites with HTTPs.
Create the Let’s Encrypt ClusterIssuer with the manifest we saw earlier:
microk8s kubectl apply -f "$HOME/letsencrypt-clusterissuer.yaml"
Now wait for the ClusterIssuer to become ready:
microk8s kubectl wait \ --for=condition=Ready \ clusterissuers.cert-manager.io \ letsencrypt \ --timeout=180s
Sample output:
clusterissuer.cert-manager.io/letsencrypt condition met
Create an NGINX deployment for our website and expose it as a Kubernetes service:
microk8s kubectl create deploy nginx \ --image=nginx \ --replicas=2 \ --port=80microk8s kubectl expose deploy nginx
Now create an Ingress resource for our website using the manifest we saw earlier:
microk8s kubectl apply -f "$HOME/nginx-ingress.yaml"
Wait for the nginx-cert certificate to become ready:
microk8s kubectl wait \ --for=condition=Ready \ certificates.cert-manager.io \ nginx-cert \ --timeout=180s
Sample output:
certificate.cert-manager.io/nginx-cert condition met
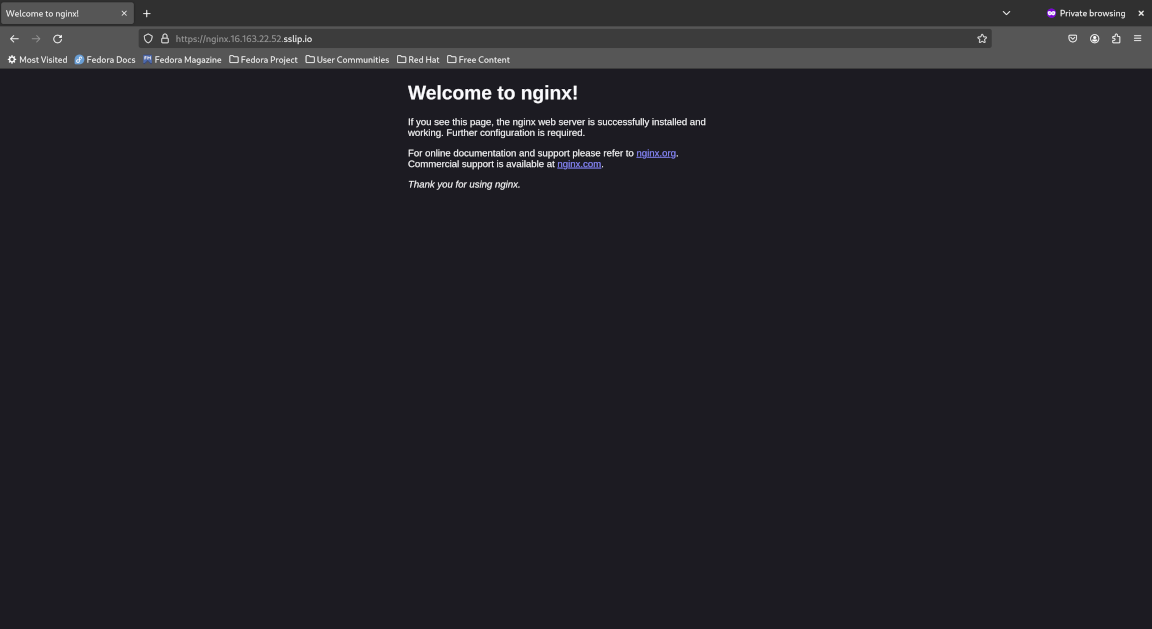
Now open a new private window and visit our website again. Notice the following:
- We no longer receive a certificate warning since the Let’s Encrypt certificate is trusted and secure
- We are greeted with the NGINX welcome page which indicates our website is functional
- If we view the website certificate, we see that it is officially signed by Let’s Encrypt
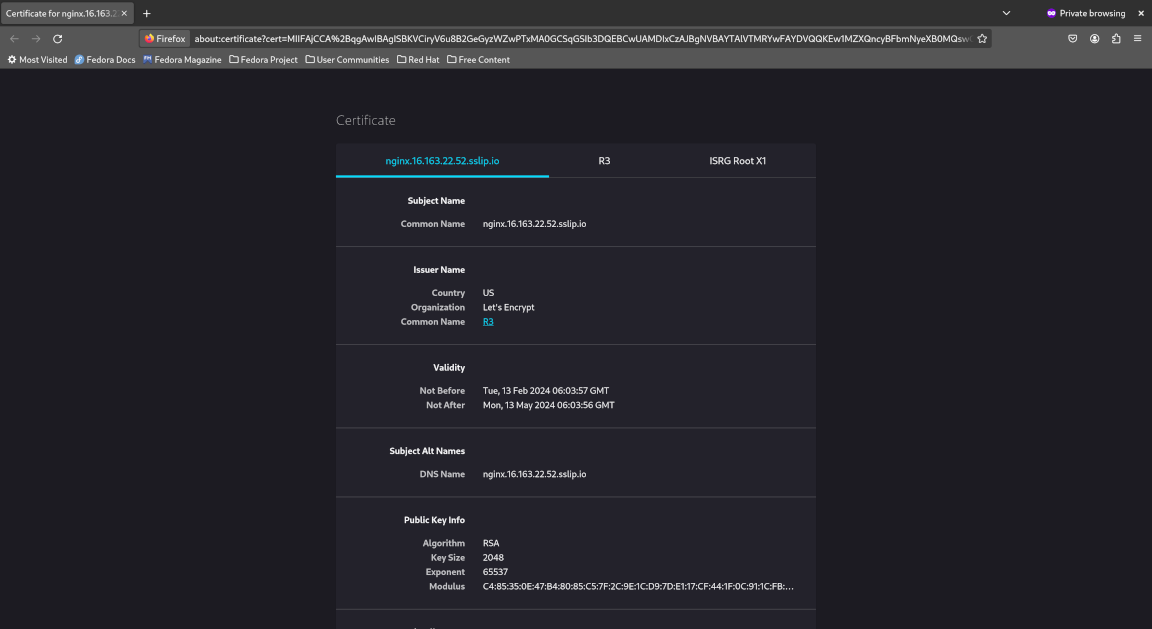
Congratulations! You have successfully set up a MicroK8s edge node, deployed an NGINX web service to MicroK8s and exposed it to the Internet securely with SSL/TLS encryption using an SSH reverse tunnel, Kubernetes ingress, cert-manager and Let’s Encrypt.
Log out of the MicroK8s edge node and return to your laptop session.
Tearing down
Tear down the AWS infrastructure provisioned for this lab to save costs.
tofu -chdir="opentofu/${CLOUD_PROVIDER}/" destroy
Concluding remarks and going further
We saw how MicroK8s is a lightweight, batteries included Kubernetes distribution that “just works” for edge computing use cases, developer environments and homelabs alike. With the unique “addon” approach, many common Kubernetes extensions and middleware can be enabled on MicroK8s with a single microk8s enable command and it is even possible to develop and distribute your own addons since MicroK8s 1.24. Furthermore, we saw how cert-manager automates the management of SSL/TLS certificates through Kubernetes custom resources so you don’t have to type in arcane openssl commands or perform step-by-step domain verification manually.
I hope you enjoyed this lab and stay tuned for updates 😉
 Donald Sebastian Leung
Leave a comment